A practical winterizing walkthrough, from the plumbing to the final storage check.
Start before freezing weather arrives. Work through your RV’s winterizing instructions with a checklist beside you, then record what you changed for spring.
1. Gather the right supplies
Make a component list. Write down your RV year/model, heater model, battery type and every appliance connected to water. Save the manuals where you can read them offline.
Walk through the RV first. Locate each drain and valve before opening anything. Photograph the normal valve positions and label the photos so you can restore them later.
Choose the manual’s method. Antifreeze, compressed air or a combination may be specified. Do not mix instructions from unrelated RV layouts.
Set up your work area. Park securely as instructed, chock wheels and arrange access without climbing onto a wet or icy roof. Keep a towel, catch container, flashlight and checklist nearby.
Ready to proceed: You can identify the valves and have instructions for every water-fed appliance. Missing information is a reason to ask your dealer before starting.
Find your drain locations, winterizing inlet, filter instructions and water-heater model. Have the specified tools, towels and an approved winterizing adapter ready.
Use RV/marine antifreeze labeled for potable-water systems, compatible with your equipment and rated for your expected temperatures. Never use automotive antifreeze. Follow the label’s dilution instructions; do not assume one gallon will cover every RV.
If your manual specifies compressed air, use a suitable blowout adapter, clean air and a regulator. Set the pressure to your manufacturer’s limit—not a number copied from another camper.
Plan disposal first. Use a designated dump station for sewage. Keep waste-handling tools separate from potable-water fittings and wash up afterward.
Prevent refilling. Disconnect the city supply and turn the pump off. Follow the manual’s instructions for releasing line pressure and opening drains.
Account for residual water. Water stopping at a drain is only one checkpoint; it does not confirm that pumps, traps or appliance internals are empty.
Check before touching the heater drain: Heating sources are off, water has cooled and pressure has been relieved. Stop if you cannot confirm all three.
Empty and rinse waste tanks at an approved disposal point. Disconnect city water, switch off the pump and drain the fresh tank and low-point drains as your manual directs.
Turn off every water-heater energy source. Let the water cool completely and relieve pressure using the heater’s instructions before removing any drain plug or anode. Never loosen a hot or pressurized heater.
3. Follow your water-heater procedure
Tank-style heater: Use its specified drain fitting and tool. Keep removed parts together in a labeled bag and inspect them as the manual directs. Record the bypass position; valve count and handle orientation vary.
Tankless heater: Identify the exact model. Some need internal draining steps that simply opening a faucet will not accomplish.
Hydronic heating: Distinguish the domestic-water side from the heating coolant loop. Do not drain or add fluid to a heating loop using a generic plumbing checklist.
For example, Truma’s AquaGo guidance calls for its Easy Drain procedure and does not recommend high-pressure air or antifreeze inside the heater. Follow its bypass instructions when winterizing the rest of the RV.
Finish check: The heater has been protected using its own procedure and remains switched off. Mark the controls so it cannot be accidentally heated while empty.
For a conventional tank heater, drain it and set its bypass as instructed before circulating antifreeze. Bypassing alone does not empty the tank. Tankless and hydronic systems need their own manufacturer procedures; do not assume a tank-heater bypass method applies.
Use a room-by-room route: Kitchen → bathroom → shower → toilet → exterior fittings. On paper, give every mixer tap separate hot and cold checkboxes. Follow your manual if it specifies a different order.
For an approved air method: Connect the regulated adapter as directed, open the required outlets and work through each circuit. Do not pressurize a closed system or use additional pressure to force a blockage. Protect the pump and appliances separately where required.
If antifreeze does not flow: Turn the pump off before investigating. Recheck pickup immersion, valve settings and filter bypass instructions. Do not let the pump run indefinitely or keep adding antifreeze without finding where it is going.
Finish check: Mark each outlet only after completing the required procedure. Jayco’s walkthrough illustrates why control-panel settings and both hot and cold circuits need attention.
Remove or bypass filters as directed. Close drains when your procedure requires it. For the antifreeze method, use the designated winterizing inlet or pump pickup rather than filling the fresh tank unless your manual specifically calls for that.
Run the pump and work through hot and cold taps individually until the specified antifreeze reaches each outlet without dilution. Include the toilet, shower hose, outdoor shower and outside kitchen. Keep the pickup supplied so the pump does not run dry.
Finish by switching off the pump and setting valves and taps to their prescribed storage positions. Label them and wipe up spills.
Create a second list for components outside your normal faucet route: toilet sprayer, outdoor kitchen, shower quick-connect, refrigerator water line, washer, dishwasher and black-tank flush. Mark equipment you do not have as “not fitted,” rather than leaving an unexplained blank.
Check each appliance’s instructions for its inlet, internal reservoir and discharge side. Do not force an inlet check valve or disconnect unfamiliar pressurized fittings. Arrange service if a circuit cannot be reached or verified.
Finish check: Every item on your component list is completed or clearly flagged for service. A missed appliance is not covered by winterizing the main water lines.
Add the specified amount of approved antifreeze to sink and shower traps and protect the toilet seal according to its manual. An air-only procedure still needs attention to traps, the pump and components that retain water.
Follow separate instructions for washers, dishwashers, ice makers, drinking-water dispensers, filter housings and tank-flush lines. A protected kitchen faucet does not prove every branch is protected.
6. Prepare the rest of the camper
Make a storage record: Note the date, parking location, battery plan and anything needing repair. Take photos of existing seal damage so later checks are easy to compare.
Match the battery plan to the equipment: Check the specified storage charge and temperature range. Do not assume a charger or solar panel may stay connected all winter. Lithium charging in freezing conditions can require specific protections; Battle Born’s storage guidance is an example for that brand, not a rule for every battery.
Plan return visits: Put a reminder on your calendar and check after severe weather when access is safe. Look for fresh water stains, odors, damaged covers or pest evidence. Do not rely on scented household products as a guaranteed pest barrier.
Interior: Remove food and freeze-sensitive liquids. Clean and dry the refrigerator; use its storage latch if provided. Check cupboards for crumbs and dampness.
Exterior: Inspect roof seams, seals and openings from a safe position. Repair leaks with compatible materials. Keep required vents unobstructed.
Tires: Follow tire and chassis storage guidance for inflation, support and covers.
Batteries: Use the battery maker’s storage, temperature and charging instructions. Lithium and lead-acid batteries have different requirements; a maintainer must match the battery.
Systems: Follow propane, engine, generator and solar-controller storage instructions. Do not assume the battery disconnect isolates every charging source.
Revisit during storage to look for leaks, moisture, pest activity and battery issues. Winterizing is preparation, not a substitute for periodic checks.
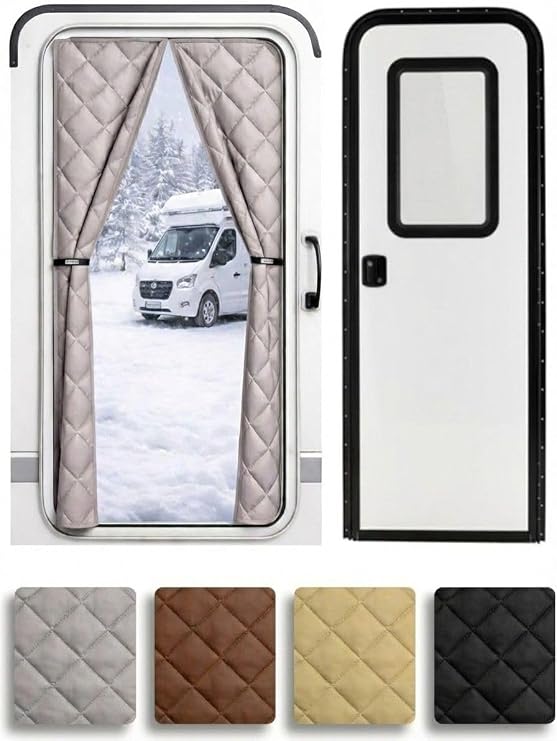
Choose supplies to suit your camper and its manuals. The insulation and door cover are comfort accessories; they do not replace plumbing winterization.
Affiliate disclosure: As an Amazon Associate I earn from qualifying purchases. Check the current listing for fit, included parts and product instructions.
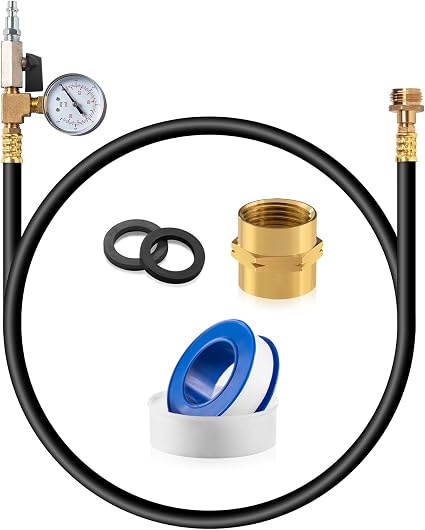
Kbrotech winterizing blowout kit
A flexible 60-inch hose with a pressure gauge, shutoff valve and garden-hose fittings for a manufacturer-approved air winterizing procedure.
Before you buy: A gauge measures pressure; it is not a regulator. Use regulated, clean air and your RV manual’s pressure limit.
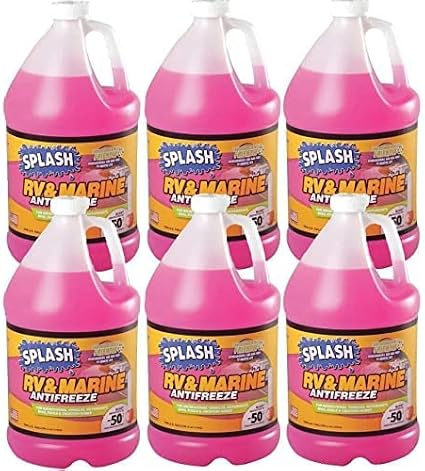
Ready-to-use pink RV/marine antifreeze. The linked listing is a six-gallon option with a labeled −50°F burst-protection rating.
Before you buy: Burst protection is not a freeze-point guarantee. Confirm potable-water-system suitability on the label and follow the RV and appliance manuals.
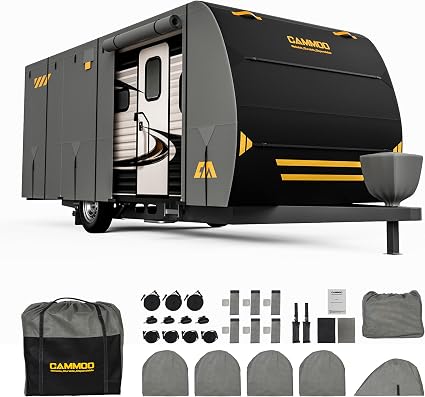
A nine-layer cover with access panels, vents and securing straps. The linked option is sized for 27–30-foot travel trailers.
Before you buy: Measure using the seller’s sizing guide. Check included accessories before buying separately; this listing includes a tongue-jack cover.
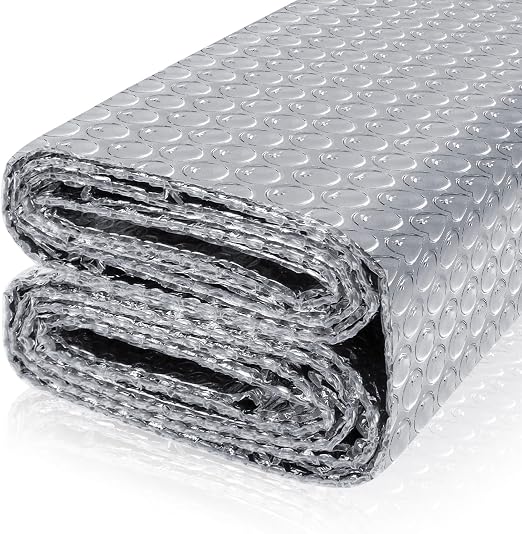
A double-sided reflective bubble sheet, listed at 23.6 inches × 10 feet, that can be cut to fit suitable window areas.
Before you buy: Check window-maker guidance, inspect for condensation and keep emergency exits and required ventilation clear. This does not winterize plumbing.
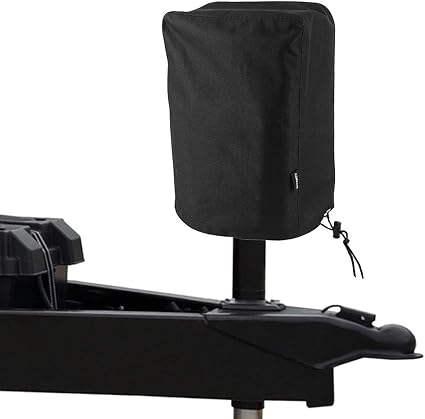
A black 600D polyester protective cover with drawstring closures for an electric tongue-jack head. Listed dimensions: 14 inches high × 5 wide × 10 deep.
Before you buy: Measure the jack head and check clearance before ordering. Secure the cover as instructed and inspect it during storage.
Tick these as you finish. Checkmarks last only while this page stays open; print a copy for your RV records.
Before the next trip
Reverse the winterizing procedure, flush and sanitize as directed, reinstall filters and check for leaks. Refill a tank-style water heater completely before restoring its heating power.
Original guide by Roam Ready Finds. Manufacturer references are linked beside the relevant sections; they are not endorsements. Illustrative artwork created for this page.